Installation and Execution
Table of Contents
Introduction
You can use Fuze from the command line (CLI) or the WebUI.
Your choice of UI depends upon what you are trying to accomplish. Here is an overview of the various operations available for the various UI’s.
CLI
Build and packaging (CLI is required)
Recreating previous builds (CLI is required)
Requirements for CLI
Network access to container repository
Network access to Fuze backend
Fuzeapp for CLI
Fuze CLI is provided by a compiled “fuzeapp.” You must use the proper executable for your host OD, i.e., Windows, MacOS, or Linux.
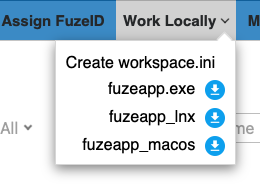
To obtain the Fuzeapp, to go the WebUI and get it from “Work Locally” menu:
Once downloaded, put it in a location within your PATH or create a system alias to it.
Executing Fuzeapp
On MacOS or Linux, utilize a terminal with whichever shell you like. On Windows, use a PowerShell and run it as Administrator.
Execute the Fuzeapp from within your workspace, which is the directory that contains a workspace.ini file at its root.
An example with getting the version of Fuze:
$ alias fuze='~/bin/fuzeapp_lnx'
$ cd ~/work
$ ls
workspace.ini
$ fuze --version
2023-02-09 10:53:56,883 [            fuze.__init__        :225  ]  INFO     Checking if there is internet connectivity...
2023-02-09 10:53:57,194 [            fuze.execute         :428  ]  INFO     Fuze version is: 2.0.220224-4c0-12250
WebUI
The WebUI provides all of the functionality required by non-developers and a convenience interface for developers.
Downloading the Fuzeapp
Using the WebUI
The only thing you need is the URL and credentials on the system. Credentials are hooked into SSO, so your normal company credentials work.